Despite having cut my finger and passing out on the sofa for Mother's day weekend, I managed to plug away at the gardening chores thanks to Tylenol . Sunny and warm weather is nothing but a distant memory as it has been raining for a week and just as well because the girls had and still have a stomach flu. After Valentina decided to give me a vomit shower on Tuesday @3am by 11am gravol became my new BFF . I have been praising the makers of gravol ever since and love them more than Tylenol at this point.
Before the gravol era kicked in, I was on a gardening marathon ...which started with my half a yard of triple mix soil.
This is the edging that was pushed up by the long winter months.
The dead tree branches were pruned and were awaiting transportation to the burn pile.
Beds begging to be weeded and the soil turned.
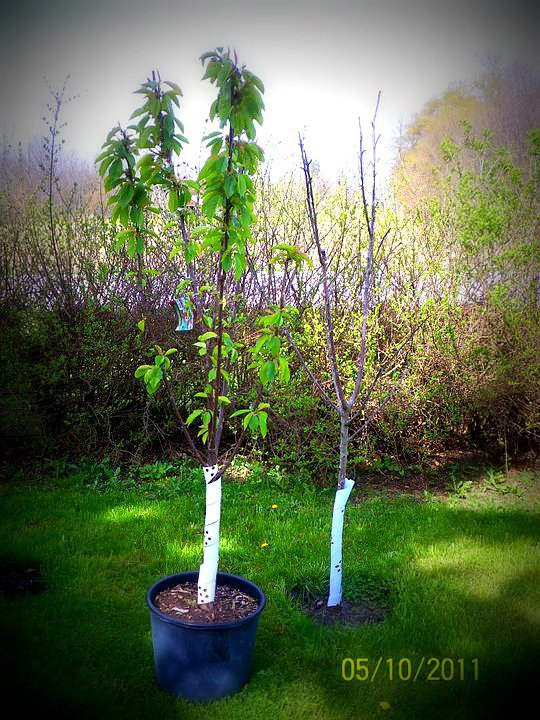
The new cherry tree waiting to be planted.
Then there was the grass that need cutting because it was almost a tall as the twins. We got a new lawn mower that mulches as it cuts and it is the best thing ever, especially when I have to cut under the pine trees. The pine cones no longer fly in the air and hit me in the face...what's not love?!
Here are some tips for planting cherry trees I learned;
Before purchasing trees, evaluate the pollination requirement of the given fruit crop.
Place pole-type pollinators every 60 to 120 feet in every row, with adjacent rows offset.
The honey bee is the most important carrier of pollen.
All sour cherries are self-fruitful. All sweet cherry varieties, except Stella, are self-unfruitful and must be cross-pollinated.
The location should have soil that is well drained, since standing water will easily kill the trees. The location should also have good air drainage, keeping low-lying cold air in the spring away from the tree. The location used for planting cherry trees should also provide for full sun access. If planting cherry trees in a lawn, the grass should be removed from the planting area in a four-foot diameter circle, to prevent the grass from competing with the young tree for nutrients and water.
Once the site is selected, the first step in planting cherry trees is to dig the hole. The hole should be approximately twice the diameter of the root system, and two feet deep.
The soil should also be loosened up around the border to allow the roots to break through more easily. The roots should be spread out on the loose soil, ensuring that they are not twisted or crowded. Soil should be placed around the roots and pressed down firmly, to remove any air pockets.
Sour and Sweet Cherry
All sour cherries are self-fruitful, such as Montmorency, North Star, Balaton, Meteor, English Morello, Early Richmond, Hansen Bush Cherry and Nanking. Most sweet cherries are self-unfruitful(self-incompatible, SI) and require cross pollination with another variety as the pollen source.
Some varieties, e.g. Bing, Lambert, Royal Ann/Napoleon, are also cross-unfruitful and cannot be depended upon to provide pollen for each other. Index, Lapins, Skeena, Sweetheart, WhiteGold, Sonata, Stella, Symphony, Sunburst, and BlackGold are self-fruitful (SF) sweet cherries that can serve as "universal" pollen sources for many self-unfruitful sweet cherry varieties (Stella does not work for Bing in some areas).
Their use as "universal" pollinators should also take bloom timing into consideration as follows. Early-bloom: SI – Somerset; SF – Lapins and Skeena. Early- to early-mid-bloom: SI – Kristin, Chelan, and Black Republican; SF – Sweetheart and WhiteGold. Mid- to late-mid-bloom: SI – Royalton, Summit, Ranier, Royal Ann / Napoleon, Bing, Burlat, Van, Regina, Lambert, Sam, and Windsor; SF – Sonata, Stella, Symphony, and Sunburst. Late-bloom: SI – Gold and Hudson; SF – BlackGold. Move bees into orchards on the first day of bloom.
I found a couple of these feather or fur piles through out the property...not to sure what it was but I ran the lawn mower over it just the same. That sounds awful I know but it's the cycle of nature out here and I was not about to try and pick that up.
Next came the cedar shrubs that did not survive my husband's terrible planting job. Hence the new ban on him ever planting again.
How to Plant a Cedar Hedge
LOCATION:Salt damages the evergreen foliage, causing tissue death. Cedars prefer a sunny to part shady area in the garden. They will not grow uniformly or properly in a heavily shaded area.
Do not plant a cedar hedge near steep gradients. Moisture loss is a serious problem with steep slopes.
Be sure to plant at least 3-4 feet away from walkways, roads or any property edges.
PLANTING: White Cedar (Field Cedar) or Pyramidal Cedar (Emerald Cedar, Brandon)
Dig a trench 16 inches (40 cm) wide and deep along this line. Place plants 12 to 18 inches (30 to 45cm) apart.
Place plants then backfill with existing soil that has been mixed with manure, compost, triple mix or peat moss.
In heavily sandy soils add 2 parts amendment (ie: manure) to 1 part existing soil. (Cedars thrive on moisture and nutrient rich soils.)
Push the soil firmly around the roots ensuring that the plant remains straight and at the right soil level. Be sure to soak the trench well after planting and add plant starter fertilizer to the water.
During planting it is advised to feed with Plant Starter fertilizer Organically rich soil is preferable to help maintain moisture. Supplementing the existing soil with manure will improve soils water retention. Watering thoroughly is key for helping cedars take root after planting. Begin by measuring the distance of the planting line. Never situate a cedar hedge close to anywhere near a walkway or roadway where salt is used over winter.
WATERING:
Thorough watering is better than light, infrequent watering.
Let the hose sit at the base of the planting trench and allow water to lightly trickle for several hours, while moving the hose down the line of cedars every other hour. Another way is to use a soaker hose along the planting line.
Water like this every week right after planting and use your own discretion during drought like conditions. Thoroughly soak the roots again in late fall for them to maintain adequate moisture for over wintering.
SOIL: Mulch is an excellent method of adding nutrients to the soil, slowly over time. It also inhibits evaporation.
FERTILIZING CARE: Subsequently feed with water-soluble plant fertilizer, three times through the growing season (once in May, June, and again in July).
Fertilizing with slow release nitrogen and phosphorus is advised in late fall to give the hedge an added boost for spring.
A combination of Blood and Bone Meal can also be used as an organic alternative.
They are predicting a hot and dry Summer despite the rain and I am preparing by using some xeriscaping in my garden beds. Xeriscaping refers to a method of landscape design that minimizes water use.Although we have a well, I don't want to stand outside for long periods of time watering everything.
After a week of rain
After
The view from my kitchen window
They are calling for another week of rain so my new garden bed wont be cut and my wisteria bush will have to wait to be planted. Feeling the way I do.....it's not such a bad thing after all.